No *.chk found for database ‘XXXX’

Error

No *.chk found for database ‘Microsoft Exchange Server\Microsoft Information Store\XXXX\Mailbox Database’

Cause

This error suggests that the checksum file was not correctly uploaded during the most recent backup.

Resolution

Run another Exchange database backup, which should resolve the issue.

Posted in File backup: Server: general issues | Leave a comment

Why am I being prompted to setup a trial registration?

Situation

You already have a CyberSecure standard/advanced account, however the software is prompting to setup a trial registration.

Cause

  1. You are logged on as a different local user than the account was originally setup under.
  2. The local profile folder has been moved or deleted.

Resolution

You have 2x choices:

Find the original local account the backup was setup/managed under

  1. Check which active profile the software is referring to.
  2. Login to the computer as the local user as defined in the active profile
  3. You should be able to manage the backup under this account

OR migrate the active profile to a different local user

If you want to change the user that the active backup profile is registered under, perform these steps:

  1. Stop the “online backup scheduler” service
  2. Copy the ENTIRE .obm or .acb folder into the updated profile path location as specified in home.txt in the previous step
  3. Edit home.txt to point to the new profile path, eg: “C:\Users\new user\.obm” or “C:\Users\new user\.acb”
  4. Start the “online backup scheduler” service
Posted in File backup: Desktop, File backup: Server | Tagged , , | Leave a comment

Unable to log start to server. Error=”Software caused connection abort: recv failed”

Error

Unable to log start to server. Error=”Software caused connection abort: recv failed”

Cause

This can be caused by the system tray agent running multiple times as different users.

Resolution

  1. Kill all processes named “Systray64.exe”.
  2. Check the user profile location to ensure that only one active user profile is being loaded
Posted in File backup: Server: general issues | Leave a comment

The RPC server is unavailable

  1. Open windows firewall
  2. Add inbound rule
  3. Choose “Allow a program”
  4. Allow “%ProgramFiles% (x86)\StorageCraft\ShadowProtect\ShadowProtectSvc.exe”
  5. Allow access from Private & Domain networks
  6. OK through everything
  7. Attempt the connection again
Posted in Other data protection: errors | Leave a comment

Best practices for local copy backups

Pre-flight checklist

  1. We recommend creating a separate backup set for local copy backups that mimics your offsite backup set. The reason for this is proper segregation and better error reporting if things go wrong.
  2. Your local backup location should have plenty of free space and be assigning the same drive letter/mount point each time the backup runs.
  3. If the local copy destination is a network share, then see our best practices guides for network shares, specifically you should create a pre-command that mounts the share before the backup runs.

Process for creating local copy backup

  1. Create your offsite backup set first
  2. Once this has been created, go into settings
  3. Add a new backup set of the same type as the offsite set, labeling the set something descriptive that includes the machine name and type of data.
  4. Create the set using best practices for the particular backup set type
  5. OK through the wizard and return to the settings screen
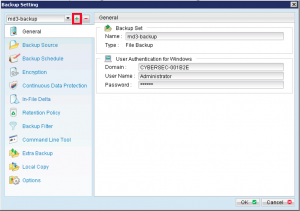
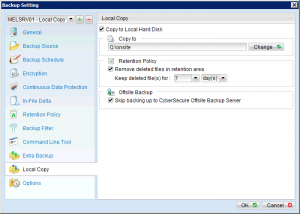
  6. Go into the “Local Copy” settings and make the following suggested changes
  7. The key settings are:
    1. Enable copy to local hard disk -> enter the correct onsite location here. Network shares that require authentication need to be mounted with a pre-command, see our best practices guide on how to setup a pre-command to mount the network share.
    2. Skip backing up to the offsite server -> enable this to make this set onsite-only (offsite replication is already being done in the other backup set)
  8. Check the retention policy and adjust accordingly
  9. Setup any additional local copy sets
  10. OK and save your settings
  11. Monitor the backup reports as per usual
Posted in File backup: Server: issues with backup | Tagged , , | Leave a comment

All about passwords

There are two types of passwords in file backup desktop/server editions: an account password and an encryption password.

Account Password

  1. There is one account password per backup account.
  2. Allows access into the backup account.
  3. Can be changedhowever it’s not recommended the account password be changed unless there is a very good reason, since the account password will then differ from the backup set(s) encryption password, which cannot be changed.

Encryption passwords

  1. There is one encryption password per backup set
  2. Allows decryption of backup data within backup set
  3. File backup desktop only has one backup set, server edition can have multiple backup sets.
  4. The encryption password cannot be changed once the backup set has been created.
  5. By default the account password is used as the encryption password when creating a backup set.
  6. The encryption password is cached locally on the machine (under the backup profile location) so that automated backups can run without prompting for the password.
  7. If the encryption password is forgotten it can ONLY be retrieved from your existing software installation for both the desktop edition and server edition.
Posted in File backup: Desktop, File backup: Server | Leave a comment

No checksum file found. File X is being backed up in its entirety

Error

[gdt] No checksum file found. File “XXXX” is being backed up in its entirety

Cause

The file exists on our servers but the checksum file cannot be found.

Resolution

Please contact CyberSecure support

Posted in File backup: Desktop: general issues, File backup: Server: general issues | Leave a comment

Best practices for achieving efficient backups

Data matching algorithms

CyberSecure Standard/Advanced includes delta-matching technology that enables in-file incremental transfer, which greatly reduces the bandwidth needed to send files, plus means that previous versions are also stored efficiently being just the “delta” patch file.

However to achieve this, the following conditions must be met:

  1. The previous + new file name must match exactly
  2. The previous + new files must have different timestamps
  3. The new files written must be in some type of pristine, uncompressed, unencrypted and consistent state.
    1. eg. A ZIP file structure is different each time it’s written – this interferes with the delta matching algorithms and means the whole file is uploaded each time. If you are trying to backup a backup file from an application that generates a ZIP file, the backup will not be efficient as the whole file will be uploaded each backup.
    2. A better strategy is to point the backup at the original data (eg using our SQL database module for Advanced edition), or by first uncompressing the ZIP file to a temporary location.
Posted in File backup: Desktop: issues with backup, File backup: Server: issues with backup | Tagged , , , | Leave a comment

Changing an account from/to desktop/server edition

Pre-flight Checklist

  1. Ensure you have recorded your:
    1. Login name (see a recent backup report)
    2. Encryption password – retrieve from your existing advanced edition or standard edition
  2. Notify CyberSecure of the change – we need to migrate your account from our server-side before you will be able to login under the new edition

Process to migrate to/from Advanced or Standard

  1. Wait for CyberSecure to convert your account, we will provide confirmation when this has been done
  2. Uninstall CyberSecure from “Programs and Features” (Windows) or follow this guide for Mac OS.
  3. Download the latest edition agent from our downloads page.
  4. Install the desired edition agent – just go with the default installer settings
  5. Open the new CyberSecure edition
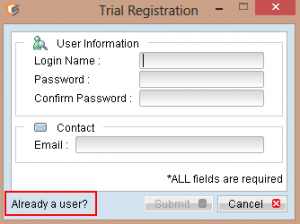
  6. Choose “Already a user” in the bottom-left of the trial registration screen
  7. Enter your account login and password (from the pre-flight checklist step)
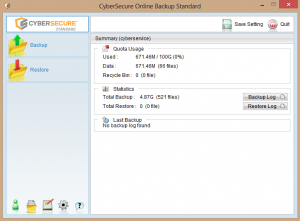
  8. You should now be at the console screen:

Final configuration checks

Check that the schedules have been configured to backup on this machine:

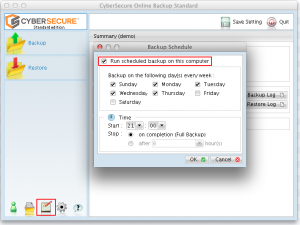
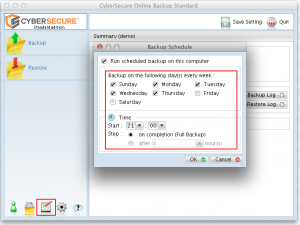
Standard Edition

  1. Open the backup schedule settings by clicking the “calender” icon:
  2. Make sure that “Run scheduled backup on this computer” is TICKED
  3. Change your schedule settings as desired:

Advanced Edition

  1. Follow this guide to configure the backup schedules on advanced edition
Posted in File backup: Desktop, File backup: Server | Leave a comment

Migrating a backup account to a new machine

Pre-flight checklist

  1. The account login name
  2. The account login & encryption password for the backup set(s) – the encryption password is normally the same as the login password.
    1. If the encryption password has been forgotten and you have access to the original machine the backup was running on, then see our password recovery guide.
    2. If you’ve completely forgotten the encryption password and do not have access to the original machine, you may have to recreate the backup sets with a new encryption password – contact our support team for more specialised advice.
  3. A new machine on which to setup CyberSecure.
  4. The latest CyberSecure installer.

Setting up on a new machine

  1. Install the appropriate CyberSecure agent onto the new machine from our download page.
  2. Run the CyberSecure software and choose “Already a user” in the bottom-left corner
  3. Login with your account username + password

Check backup source, temporary folder & schedule settings

Since the new machine will probably have a different user profile location, a different machine name and possibly different source locations – these all need to be updated to reflect the current locations.

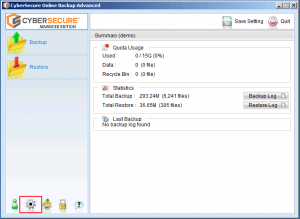
Open the CyberSecure settings (cog icon) and check the following:

  1. Go through and check the backup source locations
    1. Note: An important note regarding moved files. Moved files will be detected, and not required to be uploaded again as long as their filename, date + size has remained the same as from the previous backup. See this guide for how to properly trigger move detection.
  2. The schedule settings – note: “Run scheduled backup on this computer” must be TICKED for the relevant backup sets.
  3. Change the temporary folder exists and ensure it is read/writable (it is recommended to use c:\cybersecure-spool or similar)
  4. Once you’re done – save settings back to the off-site servers

Troubleshooting

  1. If you accidentally signed up a trial account instead of logging in under your existing account, please flush the profile and make sure you tick already a user when opening the software.
  2. If the report comes back failed, and upon checking the detailed report you can see similar warnings to “Backup source “XXXX” does not exist !“, please follow this guide to remove the old backup source locations.
Posted in File backup: Desktop: issues with backup, File backup: Server: issues with backup | Tagged , , | Leave a comment