Disable the CDP Service

CDP stands for Continuous Data Protection service. It is not being used by the CyberSecure backup tool and can be stopped and disabled:

  1. Go to Control Panel.
  2. Go into “Administrative tools”
  3. Click on “Services”
  4. From the Services window, scroll down to the “Continuous Data Protection” service
  5. Right-click and choose “Stop”
  6. Once the service has been stopped, right-click the service again
  7. Select Properties from the drop down menu.
  8. In the window that opens, change the “Start Up” type to disabled and click “Ok”
  9. Now the CDP service has been disabled and will not start on boot
Posted in File backup: Desktop, File backup: Server | Tagged | Leave a comment

Fixing missed backups

To fix a missed or stuck backup, follow the steps below in sequential order.

Check the client software to see if the backup has been scheduled

  1. Ensure that you are on  the computer whose backup is being missed
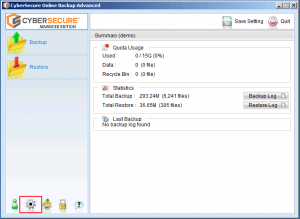
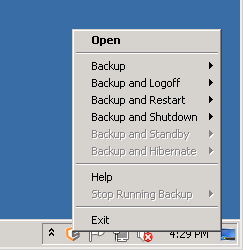
  2. Open CyberSecure. In Windows, do this by right-clicking the system-tray icon and choosing “Open”
  3. Go into the backup settings by clicking the “Cog” icon:
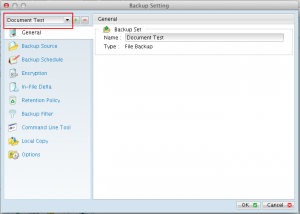
  4. Select the appropriate backup set
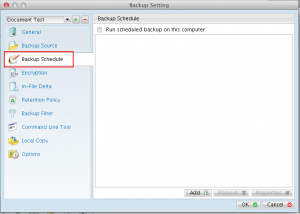
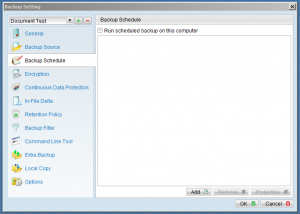
  5. Open the “Backup Schedule” settings and confirm that the “Run scheduled backup on this computer” is TICKED
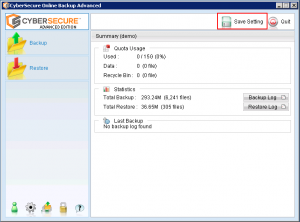
  6. Always “Save Settings” to the server to commit any configuration changes

Check the backup scheduler service is running

Stop all backup processes and clear the backup queue

  • If the scheduler is running, then the backup may have become stale or stuck, follow these steps on clearing the backup queue.
  • Wait until the next scheduled backup, if the backup is still being missed continue onto the next steps

Ensure that power settings do not sleep the computer

  • If your computer goes into a sleep mode it will miss the backup, ensure that it’s been set to stay powered on.

Contact CyberSecure support

  • If the backups are still being missed, then contact the CyberSecure support team. We can then identify the cause of the issue and provide a resolution.
Posted in File backup: Server | Tagged , | Leave a comment

Software download links

MS365 Console

CyberSecure File Backup Agent (v6.29.0.0)

Click here for the video install guide

Ensure that the TLS patch is installed AFTER installing the CS file backup agent

Posted in Downloads | Tagged , , , , , , | Leave a comment

File restore

Click here for video guide

Pre-flight Checklist

Things needed to perform a successful data restore:

  1. The backup encryption password. Without this, the data will be unreadable.
  2. Your username.
  3. A functioning internet connection to download data over.
  4. A computer ready to perform the recovery onto.

Restore data from the CyberSecure Agent

  • First, ensure that you have the CyberSecure Standard agent software installed. The software can be downloaded from the CyberSecure support website.
  • Open the CyberSecure Standard software by right-clicking the system tray icon and choosing “Open”
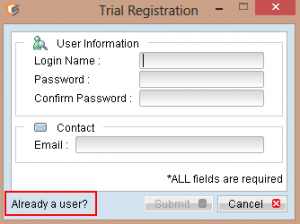
  • If this is a new installation, the first dialog screen displayed will be to register a trial user. If you already have a CyberSecure user account please use the the “Already a user” option in the bottom-left of the dialog:
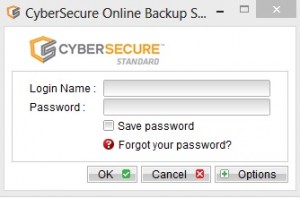
  • If you’ve already got an account, simply enter your login name + password into the dialog prompt
  • If you’ve forgotten your password, please follow our password recovery article. Or contact CyberSecure support.
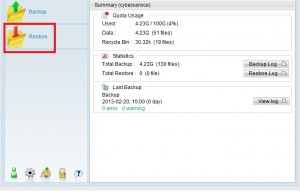
  • In the main screen, click [Restore]
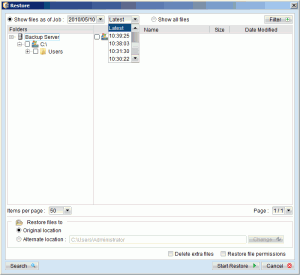
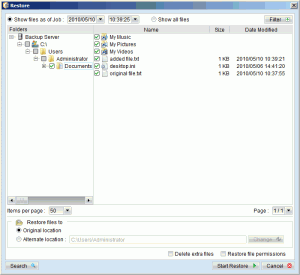
  • Choose the backup snapshot to recover. This feature allows the recovery of past versions of files if they are changed or corrupted:
  • Select the files and/or folders to recover. Entire folder hierarchies can be restored by selecting their top-level folder, which will automatically select all the folders underneath.

    Note also the “Restore files to” option, which allows the recovery of files to the original or an alternate location.
  • Click “Start Restore”.
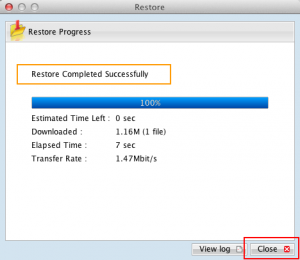
    The restore will download & decrypt the necessary data from the CyberSecure backup servers. The following dialog screen will be displayed after a successful recovery:

Data restoration settings

Setting Description
“Restore files to” Enables the restoration of data files to their original locations, or to an alternate location on the computer.
Delete extra files Removes files from the recovered location that did not exist in the restored backup. Use this option with care!
Restore file permissions Restores the file permissions & ACL’s to their original backed-up settings.
Posted in File backup: Desktop: issues with restore | Tagged , , , , | Leave a comment

Where are the log files located?

Standard/advanced edition

Windows

  1. Open the file C:\Program Files\CyberSecure\home.txt
    You will see something SIMILAR to the following EXAMPLES:

    • c:\users\admin\.obm
    • c:\users\admin\.acb
    • c:\documents and settings\admin\.obm
  2. Make a note of this location and go to it in Windows Explorer
  3. You will find the following logs in subfolders UNDER this location:
    1. Scheduler logs
      1. Relative Path:   .\log\Scheduler\debug.log
      2. Example:            c:\users\admin\.obm\log\Scheduler\debug.log
    2. Backup logs:
      1. Relative Path:    .\log\%BACKUP_ID%\Backup
      2. Example:             c:\users\admin\.obm\log\1427246943516\Backup
    3. Restore logs:
      1. Relative Path:    .\log\%BACKUP_ID%\Restore
      2. Example:              c:\users\admin\.obm\log\1427246943516\Restore
  4. The %BACKUP_ID% is a unique identifier for each backup set. It can be found by checking the backup report

Mac OS X

  • The active user profile path specifies where to look for the profile settings (called $PROFILEPATH)
  • The scheduler log is located under $USERPROFILE/Scheduler/debug.log
  • Backup logs are under $USERPROFILE/log/Backup
  • Restore logs are under $USERPROFILE/log/Restore
Posted in File backup: Desktop, File backup: Server | Tagged , | Leave a comment

[Error][New File] File=”XXXX” Error=”Access is denied. “

Error:

[Error][New File] File=”XXXX” Error=”Access is denied. ”

Cause:

  1. The file permissions are preventing access to the CyberSecure backup agent
  2. The file has been encrypted using Windows EFS (encrypted file system) encryption

Resolution:

  1. Check the file permissions
    1. Right-click the file or folder, click Properties, and then click the Security tab.
    2. From here we recommend following the Microsoft KB article on how to change permissions – http://support.microsoft.com/kb/308419#4
  2. Check whether the file is encrypted
    1. Locate the file that you want, right-click the file, and then click Properties.
    2. On the General tab, click Advanced.
    3. Under Compress or Encrypt attributes, select the Encrypt contents to secure data check box, and then click OK.


Posted in File backup: Server: general issues | Leave a comment

mysqldump: Got error: 1044: Access denied for user XXXX

Error:

mysqldump: Got error: 1044: Access denied for user ‘mysqlusername’@’%’ to database ‘mysql’ when using LOCK TABLES

Cause:

The CyberSecure Advanced software agent calls MySQL’s mysqldump program to take backups.

The message above suggests that the mysql user “mysqlusername” does not have sufficient rights to take the backup using LOCK TABLES.

Resolution:

Grant Lock privileges to the user for the databases in concern.

Also go through following URLs which shows how to grant LOCK TABLE privileges to the user for the database in concern.

http://forums.mysql.com/read.php?10,108835,192963#msg-192963

http://dev.mysql.com/doc/refman/5.1/en/access-denied.html

Posted in MySQL Errors | Leave a comment

No database file found for ‘XXXX’

Error:

No database file found for ‘XXXXX\SQLEXPRESS\msdb’
Errors found while validating your backup files. Please run a full backup to correct the problem.

Cause:

There is no correct database backup on the CyberSecure servers.

Resolution:

Run two consecutive incremental Database back manually to correct the problem.

Posted in MS-SQL Errors | Leave a comment

Cannot open backup device

Error:

[Microsoft][ODBC SQL Server Driver][SQL Server]Cannot open backup device ‘Temporary_Directory\Server\Backup_ID\Database\File’. Device error or device off-line. See the SQL Server error log for more details.
……
Microsoft][ODBC SQL Server Driver][SQL Server]BACKUP LOG is terminating abnormally.

Cause:

The message suggests that MS SQL cannot access the designated temporary directory.

Resolution:

Check the permissions for temporary directory. Make sure the CyberSecure temporary directory has complete Read/Write permissions.

If the temporary directory is on a network location, ALWAYS use the UNC path instead to mapped drive letter and ensure that the “Network Resources Authentication for Windows” configuration section has been completed in the CyberSecure settings.

If the same errors are still present, please verify if the “Log on” account of the MS SQL Server (MSSQLSERVER) service has sufficient permission right(s) to access the designated temporary directory. You can do so by following the instructions below:

  1. Open [Control Panel] -> [Administrative Tools] -> [Services] -> [SQL Server (MSSQLSERVER)] -> [Log on]
  2. Select the [This Account] option
  3. Enter the Login Credentials
  4. Restart the [SQL Server (MSSQLSERVER)] service.
Posted in MS-SQL Errors | Leave a comment

The statement BACKUP LOG is not allowed while the recovery model is SIMPLE

Error:

[Microsoft][ODBC SQL Server Driver][SQL Server] The statement BACKUP LOG is not allowed while the recovery model is SIMPLE. Use BACKUP DATABASE or change the recovery model using ALTER DATABASE.
……
[Microsoft][ODBC SQL Server Driver][SQL Server] BACKUP LOG is terminating abnormally.

or

[Microsoft][ODBC SQL Server Driver][SQL Server]BACKUP LOG is not allowed while the trunc. log on chkpt. option is enabled. Use BACKUP DATABASE or disable the option using sp_dboption.

Cause:

The message suggests that recovery model of the database in concern is currently set to SIMPLE. When using the simple recovery model, the log is truncated when periodic checkpoints occur. Only full database and differential database backups are allowed.

The following table summarizes the recovery models and backup types available with each recovery model:

Recovery Model Database Transaction Log
SIMPLE Allowed NOT ALLOWED
FULL Allowed Allowed

Resolution:

Perform only database backups

  1. Stop performing transaction logs backups and only perform database backups within CyberSecure Advanced.
    1. Open CyberSecure Advanced
    2. Go into the settings for the backup set
    3. Choose “Backup Schedule”
    4. Remove all TRANSACTION LOG schedules, leaving only the DATABASE backup schedule
    5. Following our best practices guide for MS-SQL server is always recommended
Posted in Microsoft SQL Server | Leave a comment