Error message: “unable to log to server”

Error

“Unable to log to server” appears in the detailed backup report.

Severity

LOW – not severe and no risk to data integrity.

Cause

This is a transient error and does not affect the integrity of data during the backup – it merely states that there was not enough bandwidth on the client to post logs to the CyberSecure servers.

Resolution

This issue should only occur when there are network or server problems on the client.

We have seen this with pre-commands that log large amounts of data to the backup servers – reducing the amount of log output will resolve this issue.

If the issue continues to persist it could be a sign of poor network connectivity at the client – improving network performance will resolve the issue.
Posted in File backup: Desktop: general issues, File backup: Server: general issues | Leave a comment

Cannot start scheduler. Reason: Another schedule contain the same user

Error:

Cannot start scheduler. Reason: Another schedule contain the same user

Cause:

Two users have conflicting backup schedules.

Resolution:

Change the home.txt file to point to only one users profile folder, then alter the schedule for only that user. To avoid this happening in the future, mark the home.txt as read only after making the change to the home.txt file.

Posted in File backup: Desktop: general issues, File backup: Server: general issues | Leave a comment

Cannot start scheduler. User:’null’, Home:’\\SERVER\Users\Username\.obm’ Reason:null [info] No user defined!

Error:

Cannot start scheduler. User:’null’, Home:’\\SERVER\Users\Username\.obm’ Reason:null [info] No user defined!

Cause:

Roaming profiles are in use and the “Local system” account that the scheduler runs as does not have privileges to the \\UNC path profile.

Resolution:

Change the home.txt file to point to the actual path of the profile, NOT the UNC path. A successful outcome should look like this:
[info] Start scheduler. User: 'myUserName@203.26.30.134' Home: 'C:\Users Shared Folders\Administrator\.obm'

Posted in File backup: Desktop: general issues, File backup: Server: general issues | Leave a comment

UNC path (eg: \\server\sharename) does not exist!

Error:

Backup source “\\Server\Share ” does not exist!

Cause:

The source location cannot be accessed. This is due to:

  1. The location simply not existing, OR
  2. The network location requires authentication (perhaps it’s joined to a windows domain) and since the backup process is running under the “Local system” account, the backup process does not have permission to access the network resource.

Resolution:

  1. Enter a valid network users account details into the “Windows Resource Authentication for Windows” settings within the backup software.
  2. Failing the above option, the “Online Backup Scheduler” system service may need to be run as a domain user with appropriate network rights.
Posted in File backup: Desktop: general issues, File backup: Server: general issues | Leave a comment

Error XXXX [AFTIndexFile.close] ‘\\ip address\BackupSpool\BackupSet\XXXX\RemoteTree.idx’ has not been opened

Error:

Error XXXX [AFTIndexFile.close] ‘\\ip address\BackupSpool\BackupSet\XXXX\RemoteTree.idx’ has not been opened

Cause:

A Temporary Spooling Location has been set to a UNC path and the backup process does not have sufficient privileges to read/write to this path as the “Local System” user.
Often this is caused by a NAS device that requires authentication but since the “Local System” user does not exist on either the NAS user database or domain, access is denied.

Resolution:

Change the scheduler to run under an active domain account. On the machine to be backed up, go to [Control Panel]->[Administrative Tools]->[Services]. Look for the “Online Backup Scheduler” and alter the “Logon as” user FROM “Local System” to an administrator account, ensuring that the correct password is entered.

Posted in File backup: Server: general issues | Leave a comment

Repeated entries… The name of the file cannot be resolved by the system.

Error:

C:\ProgramData\Application Data\Application Data\Application Data\Application Data\Application Data\Application Data\Application Data\Application Data\Application Data\Application Data\Application Data\Application Data\Application Data\Application Data\Application Data\Application Data\Application Data\Application Data\Application Data\Application Data\Application Data\Application Data\Application Data\Application Data\Application Data\Application Data\Application Data\Application Data\Application Data\Application Data\Application Data\Application Data”
The name of the file cannot be resolved by the system.

OR

When the backup client is backing up the same data continuously (in a infinite loop of Application Data).

Cause:

The path “C:\ProgramData\Application Data\” is actually an NTFS junction point.

Microsoft Windows includes a number of folders which are actually links (NTFS junction point) to other folders. In some cases they are recursive links which link back to one of their own parent folders. This effectively means that these folders contain an infinite number of child folders.

Resolution:

  1. Open CyberSecure Advanced by right-clicking the system-tray icon and choosing “Open”
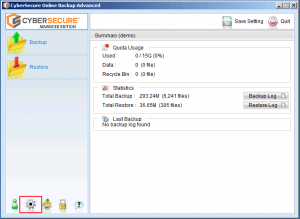
  2. Open the backup settings
  3. Select Options, and DISABLE “Follow link”
  4. Save settings and the next backup should complete without issue
Posted in File backup: Desktop: general issues, File backup: Server: general issues | Leave a comment

Forgotten password

If the account was setup on a separate computer and the hard drive contents can still be accessed, simply retrieve the “config.sys” file from the “C:\%USERPROFILE%\.acb\config” folder and copy onto the new machine. This file contains the cached encryption and account passwords.

Process for recovering the encryption password from an existing STANDARD edition installation

  1. Open CyberSecure STANDARD edition by right-clicking the system tray icon and choosing “Open”
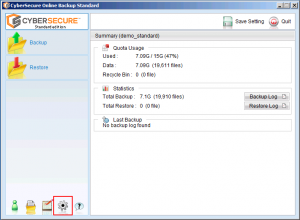
  2. When in the main console, open the settings by clicking the “Cog” icon
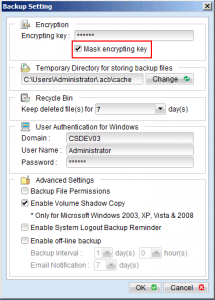
  3. UNTICK the “Mask encrypting key” to reveal the encryption password
  4. Please record this password. Without it the backup data stored on the CyberSecure servers will be UNREADABLE.
Posted in File backup: Desktop | Tagged , , | Leave a comment

Restarting or stopping the backup scheduler

Windows

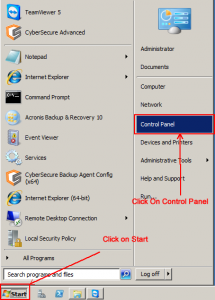
  1. Click on the “Start Menu” and click “Control Panel”
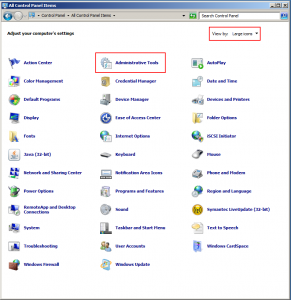
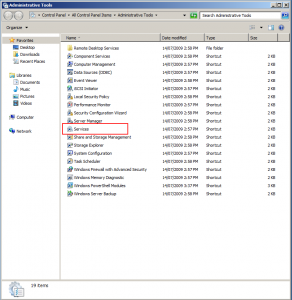
  2. Select “View : Large Icons” on the top right corner of the screen, if it is not already selected. From all the icons on the screen, select “Administrative Tools”.
  3. From the tools list, select “Services”.
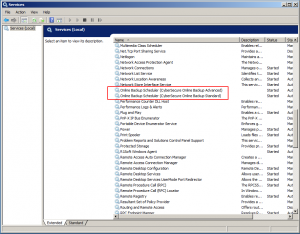
  4. From the service list, find the scheduler for your version of the software. For standard users, it will be “Online Backup Scheduler ( CyberSecure Online Backup Standard )” and for advanced users, it will be “Online Backup Scheduler ( CyberSecure Online Backup Advanced )”.
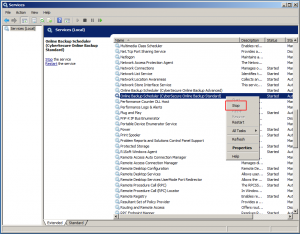
  5. To stop the scheduler, right click on the selected service and click “Stop” in the pop-up menu.
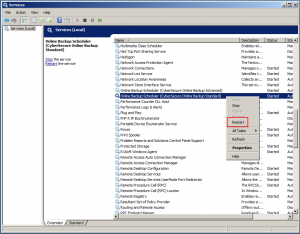
  6. To restart the scheduler, right click on the selected service and click “Restart” in the pop-up menu.
  7. And you are done.

Mac OS X

The following use the “sudo” command to execute with elevated privileges.

  1. Open “Terminal” (under Applications->Utilities)
  2. To find which user you are logged in under, type “whoami”.
  3. Then use the following commands to stop + start the scheduler service. The “sudo” command will prompt for your password – be sure to enter this correctly. It will not echo to the screen.
Action Command
Check if the scheduler is running echo -n 'scheduler is ';pgrep -qfi obcs "cybersecure && obcs";if [ $? -ne 0 ];then echo -n 'not ' ;fi;echo running
To stop the scheduler sudo pkill -fi obcs "cybersecure && obcs";sudo rm /Applications/CyberSecure\ Advanced/ipc/Scheduler/*
To start the scheduler sudo /Applications/CyberSecure\ Advanced/bin/Scheduler.sh &
Posted in File backup: Desktop, File backup: Server | Tagged , , , | Leave a comment

Common issues & solutions

Where are the local settings/profile stored?

Platform Location
Windows C:\Users\%user%\.acb
Mac OS /Users/%user%/.acb

Erasing this folder will flush all local settings and effectively create a “fresh” install of CyberSecure. This can be used if there are problems with the local installation and you’d like to rebuild the settings from the CyberSecure servers without reinstalling the software.

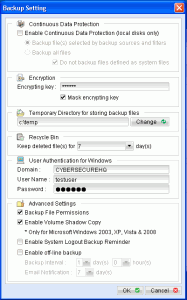
What are some of the settings I can change?

Setting Description
Enable continuous data protection Allows the constant backup of selected files/folders as they are changed
Encrypting key The password used to encrypt your data – this MUST be remebered in order to recover your data.
Mask encrypting key When unchecked allows you to view the encryption password.
Temporary directory for storing backup files Temporary spooling directory used during backups. This location must have enough free space to hold at least 50% of the backup size and can be a common cause for failed backups if there is not enough free space.For best performance we recommend having your temporary location on a separate disk drive to your system drive.
Keep deleted files The recycle bin function allows you to retain deleted or changed files within a defined period up to 14 days
User authentication for Windows If your network drives require authenticated users, enter the details of the connecting user here to backup these drives.
Backup file permissions Allows the backup and recovery of file permission data, including user and group access
Enable Volume Shadow Copy Enable the VSS feature in Windows to enable the backup of open and/or locked files. Please note that whilst this feature can take consistent backups of open files, for SQL or Exchange servers please use CyberSecure Advanced, which has native support for these applications.
Enable system logout backup reminder Prompts you before logout to perform a backup
Enable off-line backup Reminds you to perform a backup if you computer has been disconnected from an internet connection for an extended period of time.

Moving an installation from an old to new computer

If the previous backup source locations don’t exist on the new computer, they won’t be displayed in the file selection tree, meaning that we can’t deselect them. However because they are still part of the backup source list and don’t exist, warnings will be generated.

Posted in File backup: Desktop | Tagged | Leave a comment

How to create a backup set

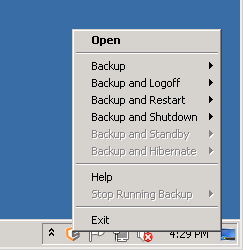
  1. Open the CyberSecure software by right-clicking the system tray icon:
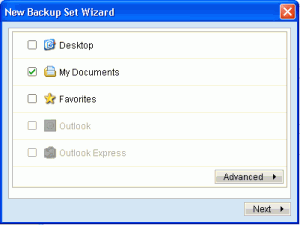
  2. If this is the first time you’ve run the software, the following screen should appear:
  3. By default, the “My Documents” folder is selected, for other specific locations, choose “Advanced”
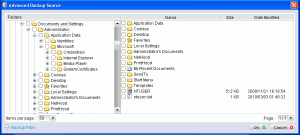
  4. The Advanced screen can be used to select individual folders for backup, even on network drives. Note that it if backing up shared folders that are stored on the local computer is highly recommended to specify the local source of the files, rather than selecting them through the network. The reason is that Volume Shadow Services cannot operate over the network and thus files in use will not be backed up.
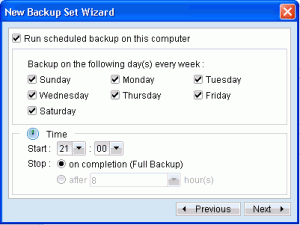
  5. Once you’ve picked the folders you want included in your backup, select the schedule for the backup.
  6. Generally starting the backup as early as possible is a good idea as it ensures you are protected early and allows the backup enough time to complete overnight.
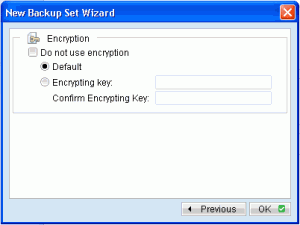
  7. IMPORTANT: the default encryption password is your current login password. Once set, the encryption password cannot be changed without deleting and starting the backup over.
  8. Choose OK and you’ll be at the main screen
  9. It’s now a good idea to “Save settings” to the server – so the CyberSecure servers can store your configuration data.
  10. From here, you can run a manual backup, or simply wait until the schedule starts for the first backup to run.
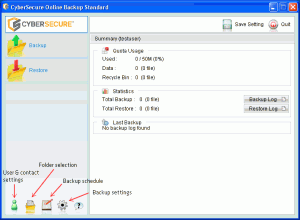
  11. The main screen has a variety of functions, allowing you to change the backed up locations, backup settings and account settings.
Posted in File backup: Desktop: issues with backup | Tagged | Leave a comment