Best practice medical restore guide

Synopsis

This guide describes the procedure for restoring the Best Practice medical software database from an approved CyberSecure installation.

CyberSecure takes a consistent backup of the best practice SQL database via Windows Volume Shadow Services (VSS) and so is not the same process as the application-level backup within Best Practice.

The file type stored by CyberSecure are the raw MDF files and so need to be placed back into the exact SQL database location for “BPSINSTANCE” on the Best Practice machine – this can vary between installations.

Process

  1. Ensure Best Practice is installed and up to date
  2. Restore the backed up data through the CyberSecure agent to a temporary location
  3. Stop the following services:
    1. SQL Server (BPSINSTANCE)
    2. SQL Server Browser
    3. SQL Server VSS Writer
  4. The default location of database files is:
    C:\Program Files\Microsoft SQL Server\MSSQL10_50.BPSINSTANCE\MSSQL\DATA

    This may be different on your server

    Copy the restored MDF files from the temporary location over the existing BPINSTANCE SQL server files EXCEPT for the following files:

    1. master.mdf
    2. mastlog.ldf
    3. model.mdf
    4. modellog.ldf
    5. MSDBData.mdf
    6. MSDBLog.ldf
  5. Start the services:
    1. SQL Server (BPSINSTANCE)
    2. SQL Server Browser
    3. SQL Server VSS Writer
  6. Log into Best Practice
  7. Check some data within Best Practice to ensure correctness
Posted in File backup: Server, File backup: Server: issues with backup | Tagged , , , , , , , | Leave a comment

The writer vetoed the shadow copy creation process during the backup preparation state. (VSS_WS_FAILED_AT_PREPARE_BACKUP)

Error:

The writer vetoed the shadow copy creation process during the
backup preparation state. (VSS_WS_FAILED_AT_PREPARE_BACKUP)

Cause:

This typically happens with Exchange 2010 when CyberSecure signals exchange to create a VSS snapshot and the shadow snapshot fails to be created.

The reason for this is one of two things:

  1. The Exchange VSS writer is in an unstable state
  2. Some other backup software also has an exchange volume shadow copy created at the same time as CyberSecure

Resolution:

  1. Check the state of the VSS writers on the system by issuing the following command as an administrator user in a cmd.exe shell:
    1. vssadmin list writers
      Here is an example of the Exchange VSS writer being in an unstable state:

      Writer name: ‘Microsoft Exchange Writer’
      Writer Id: {76fe1ac4-15f7-4bcd-987e-8e1acb462fb7}
      Writer Instance Id: {7a58fc86-40db-4464-88c8-d6e8fc2eea90}
      State: [7] Failed
      Last error: Retryable error 

      The correct state of the VSS writer should be:

      Writer name: ‘Microsoft Exchange Writer’
      Writer Id: {76fe1ac4-15f7-4bcd-987e-8e1acb462fb7}
      Writer Instance Id: {7a58fc86-40db-4464-88c8-d6e8fc2eea90}
      State: [1] Stable
      Last error: No error

    2. If the writer is showing a failed state, then restart the “Microsoft Information Store” service and check again.
    3. Should the writer often be going into an unstable state, it may be a sign of underlying problems with your environment.
  2. Disable or uninstall any other backup software that is running.
    If this resolves the issue, then try scheduling backups at a non conflicting time.
Posted in Exchange Errors | Leave a comment

Warning: Backup source “XXXX” does not exist!

Error

Warning: Backup source “X:\XXXX” does not exist ! appears in the backup report logs and causes the backup status to change to “warning”.

Cause

  1. One of the backup source locations does not exist on the computer where the backup is running.
  2. Another common cause is a mapped network drive being selected.
    Mapped network drives only exist within the currently logged on session. Scheduled backups run in a different session, so any mapped network drives will not be present under a scheduled backup.

Resolution

  1. Delete the entry from the backup source selection (if the source is invalid).
  2. Change the mapped network drive source entry to use the UNC path instead.

There are two ways of modifying the backup set source selections: either via the backup agent (standard/advanced) or via the web console (advanced edition only).

Via the backup agent

  1. Open the CyberSecure agent
  2. Go into the backup source selection (via settings for the advanced edition)
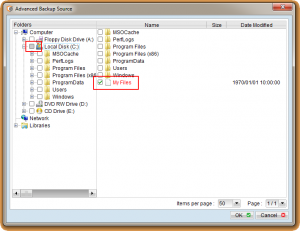
  3. Go into the “Advanced” backup source selection
  4. Locate the missing folder by selecting the backup selection checkbox on the left-hand side and drilling-down.
  5. The missing backup source location will be shown in RED on the right-hand side:
  6. UNTICK the location and OK back to the main console
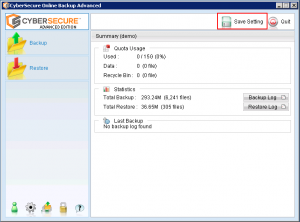
  7. Save settings to the servers

Via the web console:

  1. Ensure all agents backup console interfaces are closed before proceeding
  2. Login to the web console with your backup login name and password
  3. Choose “Backup Set” from the top-menu:
  4. Using the drop-down box, select the backup set that is showing the issue.
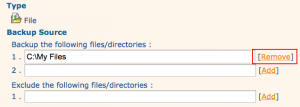
  5. Under “Backup source”, remove or correct any incorrect paths:
  6. This will immediately update the server’s configuration – the backup agents will periodically pull down the server configuration, so no further action is required on the backup agent
Posted in File backup: Server, File backup: Server: general issues, File backup: Server: issues with backup | Leave a comment

Enabling delta merging

Delta merging is a key feature that increases the efficiency of the backups by merging deltas over time.

We recommend that delta merging is enabled on structured data backups (ie. Exchange, SQL server and any other backups containing large database files)

  1. Open CyberSecure Advanced
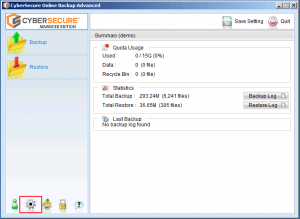
  2. Go into the Settings:
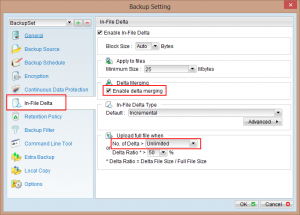
  3. On the left menu, select”In-file delta”, then check “Enable delta-merging”:
  4. Choose OK, then back at the main screen choose “Save Settings”:

Note: enabling delta merging means that only simple retention policies are possible (ie. retention via number of jobs or days)

Posted in File backup: Server | Tagged , | Leave a comment

Disabling Windows defrag scheduled task

Windows Server 2008 and 7 have an automatic defrag task that runs weekly.

Since this rearranges blocks around on the disk, this can cause image-based backups to be much larger than is necessary.

We recommend disabling the task for production environments:

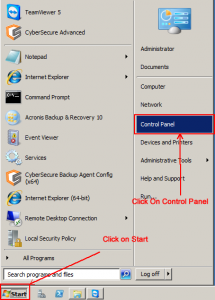
  1. Click Start, then open control panel:
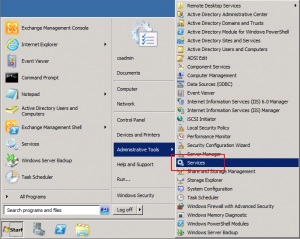
  2. Under control panel, open “Administrative Tools”
  3. Then open “Task Scheduler”
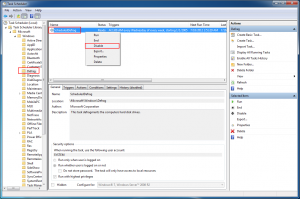
  4. In the Task scheduler, expand out the scheduled tasks under “Task scheduler library”->”Microsoft”->”Windows”->”Defrag”
  5. Right click on the “ScheduledDefrag” task and choose “Disable”
  6. This will prevent Windows from automatically running the defrag task and needlessly increasing the size of the backup incrementals
Posted in Other data protection | Leave a comment

Change the user the scheduler runs as

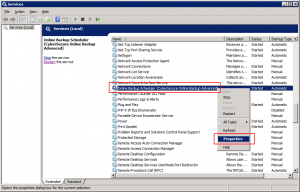
  1. Open Windows system services
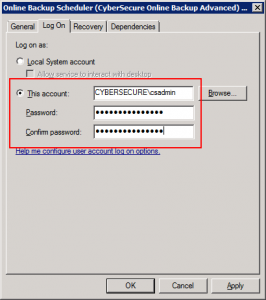
  2. Find the CyberSecure Advanced scheduler service in the list (normally under “Online Backup Scheduler (CyberSecure Advanced)” and right-click to get into properties
  3. Under the “Log On” tab, change the user from “Local System account” to “This account” – and enter a user with full privileges (ie. a domain administrator)
  4. Click OK out of everything and restart the scheduler service
  5. The scheduled backup will now run in the context of the logged on user and not the local system account.
Posted in File backup: Server | Leave a comment

Microsoft Exchange backup setup & best practices

We don’t recommend using the file backup server agent to backup Exchange. Instead, use our machine backup service. Contact sales for more information about machine backup.

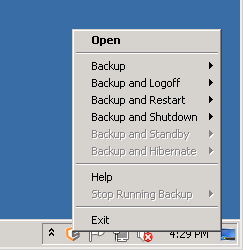
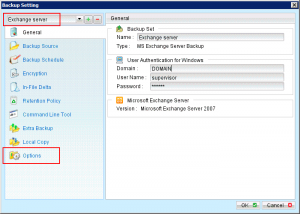
  1. Open CyberSecure Advanced by right-clicking the system-tray icon and choosing “Open”
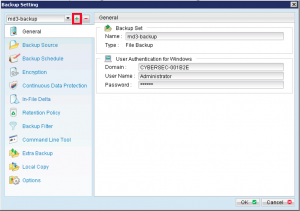
  2. Open the backup settings from the main console
  3. Click the “plus” sign to add a new backup set
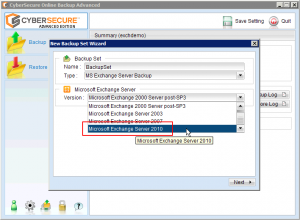
  4. Type a descriptive label and ensure that the backup set type is set to “MS Exchange Server Backup” and the version is set to “Microsoft Exchange Server 2010”
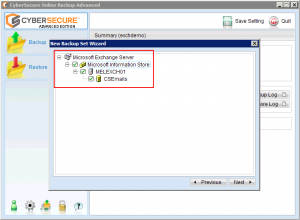
  5. Next, select the Information Store and databases to protect
  6. The schedule screen is next.
    1. If you are performing data seeding, REMOVE all schedules to turn off the automatic backup to CyberSecure’s servers.
    2. Circular logging must be disabled on all databases within the backup
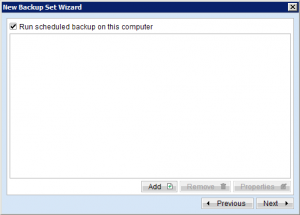
  7. To setup the recommended backup schedule, remove all existing schedules so that the schedule dialog looks like this:
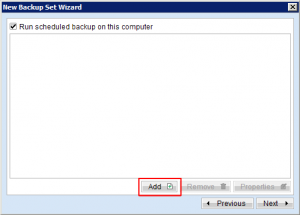
  8. Now add the backup schedule
    1. Click Add
    2. Now follow the recommended exchange backup schedule settings, according to your environment
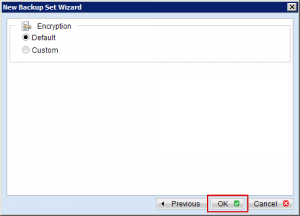
  9. Our recommendation is to leave the encryption settings at their defaults, which will use your account login password as the encryption password (see all about passwords). Once the encryption password is set the only way to change it is to recreate the backup set.
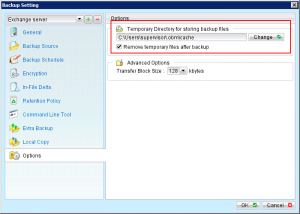
  10. The final step is to change the location of the temporary spooling folder. This is the “staging” area where Exchange spools out it’s databases before being compressed and encrypted to CyberSecure’s servers.
  11. In settings, make sure the exchange backup set is selected and click “Options”
  12. This location must have enough free space to hold your selected exchange databases for the duration of the backup.
    1. Don’t use spaces in the location folder names if possible – paths are always easier without spaces
    2. If the spooling location is being set to a network location, ALWAYS use UNC pathnames (e.g. \\NAS-DRIVE\backup\Cybersecure-spool) instead of a mapped drive letter. The reason is that windows mapped drives exist only within the session in which they were created, so when the user logs out of the system, the mapped drive will disappear.
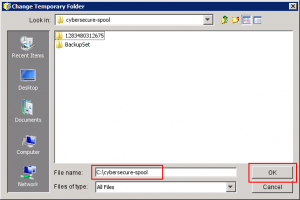
  13. Click “Change”
  14. Select the location of the spooling folder, we recommend calling it “cybersecure-spool”
  15. That’s it – OK out of everything and save settings back at the main screen
Posted in File backup: Server: issues with backup | Leave a comment

Setting a fixed size paging file in Windows

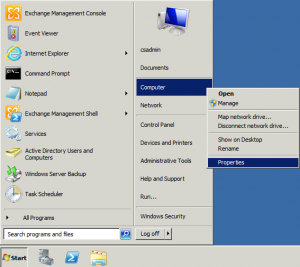
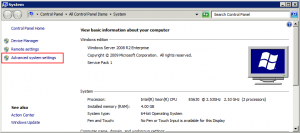
  1. Open system properties by right-clicking “Computer” from the start-menu
  2. Open “Advanced System Settings”
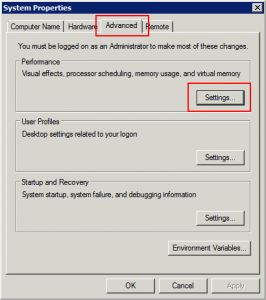
  3. Click the “Advanced” tab, then under “Performance”, click the “Settings” button
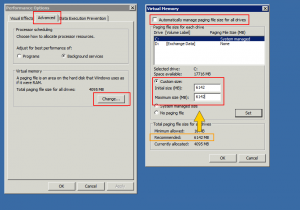
  4. In “Performance Options”, click the “Advanced” tab, then click the “Change…” button, which will take you to the virtual memory settings
  5. In virtual memory settings, untick “automatically manage paging file size for all drives”, then set the paging file to an appropriate drive and set the INITIAL and MAXIMUM paging file to the SAME custom size, using the recommended size value.
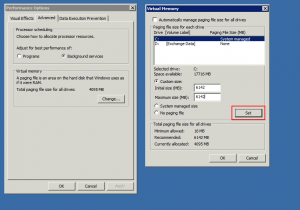
  6. Click “Set”, then OK back to the “Performance options”
  7. OK out of everything, rebooting when prompted by Windows
Posted in Other data protection | Tagged , , | Leave a comment

Configuring retention policies

Retention policies allow the storage and retrieval of previous versions of backup data.

This is an important feature as it allows an easy method of complying with business data retention laws or guidelines.

A convenient feature of retention policies is the ability to “go back in time” in the event if corruption has damaged files or if data has been deleted.

By default, the standard retention policy is to keep the last 7 days changes.

To configure retention policy settings:

  1. Open CyberSecure Advanced and click the “Cog” icon to get into the backup settings:
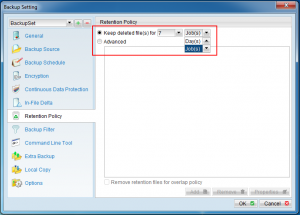
  2. Click into “Retention Settings”.
    The default settings are “simple”, meaning it will keep a rolling number of backup changes – defined either by days or jobs.
  3. Make the changes to the retention settings, click OK to get back to the main screen
  4. Save any changes to the servers before quitting the software

Advanced Retention Policy Settings

In addition to the simple retention policy mentioned above, CyberSecure advanced allows much more flexibility by using the advanced retention policy mode.

A retention policy is created by building up a set of “rules” that govern how the data should be pruned on the CyberSecure servers.

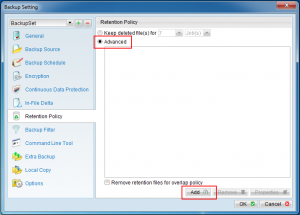
  1. In the retention policy settings, click the “Advanced” radio button, then choose “Add” to add a new retention policy rule.
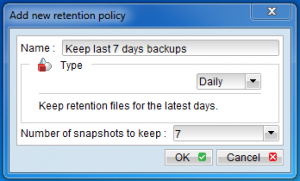
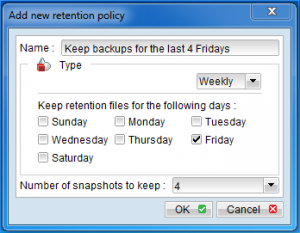
  2. Add the desired various retention policy rules
    1. Daily Retention
      Keeps the last N days
    2. Weekly Retention
      Keeps backups from certain days within a week
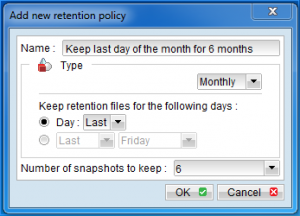
    3. Monthly Retention
      Keeps a specific day within the month for the last N months
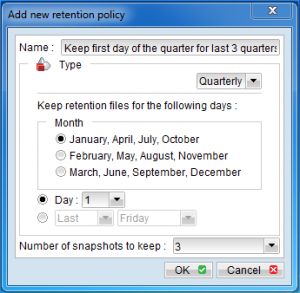
    4. Quarterly Retention
      Keeps retention based on standard annual quarters – useful for taxation record keeping purposes
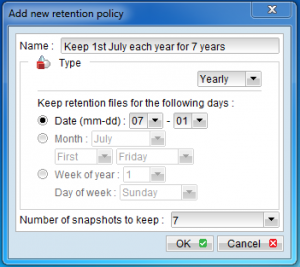
    5. Yearly Retention
      Keeps a specific day from each year for the last N years.
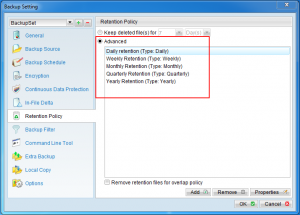
  3. As retention rules are added, they will show up in the backup settings window:
  4. When satisfied, OK out of the retention settings and go back to the main console.
  5. Save settings to the offsite servers
Posted in File backup: Server: issues with backup | Leave a comment

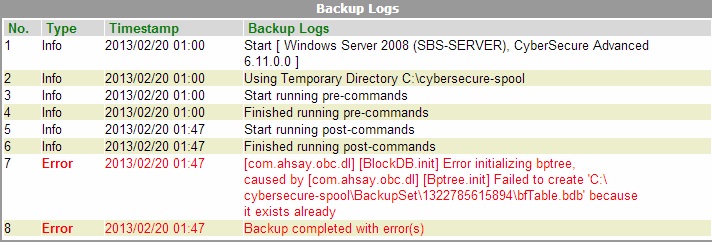
Error initializing bptree …. bfTable.bdb because it exists already

Error

[BlockDB.init] Error initializing bptree, caused by …. Failed to create ‘XXXX\bfTable.bdb’ because it exists already.


Cause

This issue can occurs if a previous backup job was terminated unexpectedly for unknown reason.

The temporary file list ‘bfTable.bdb’ created by the previous backup process (that is still running) cannot be removed by the backup software for the new backup operation.

Resolution

To resolve the issue, please manually remove the ‘bfTable.bdb’ file from the temporary folder configured for backup.

$\cybersecure-spool\BackupSet_ID\bfTable.bdb

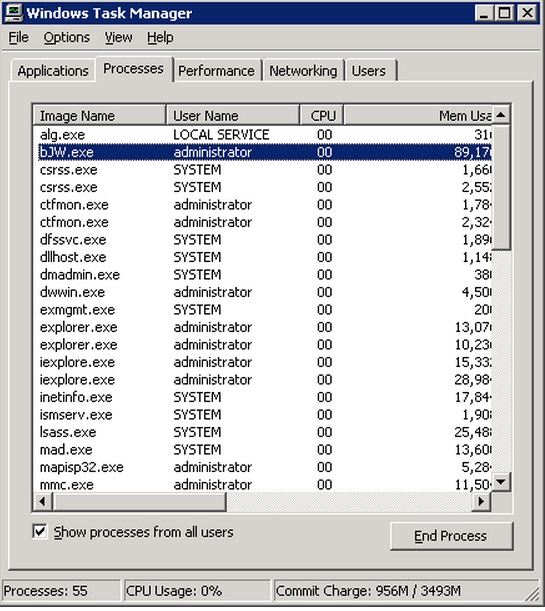
Confirm if the previous backup process is still running, by starting Task Manager, check for any ‘bJW.exe‘ process:

Terminate all ‘bJW.exe‘ process, and then remove the ‘bfTable.bdb‘ file. Re run the backup job.


Posted in File backup: Server: general issues | Leave a comment