How to recover from a frozen/locked ShadowProtect backup

Most issues are due to problems due to the Storagecraft/Microsoft VSS snapshot subsystem.

  1. Stop the “Volume Shadow Copy” service, the system will also prompt to stop the “StorageCraft Shadow Copy Provider” service, which depends on it.
  2. Restart the “ShadowProtect service”
  3. Shadowprotect should now be able to snapshot and take care of performing a backup.
  4. If the backup still cannot run, contact CyberSecure Support
Posted in Other data protection | Leave a comment

How to run the file backup agent under Mac OS

  1. Open spotlight:
    1. Click on the magnifying glass in the top-right corner
    2. OR use the keyboard shortcut: command + space
  2. Type: backupmanager
  3. The CyberSecure client will load
Posted in File backup: Desktop, File backup: Server | Leave a comment

Moving deleted data from retention back into data area

  1. Locate the backup job that caused the data to go into the retention area. This can be done by tracing back through the backup reports and finding the backup job that detected deleted data.
  2. Remove the backup schedule for that job – we don’t want the backup running whilst the data is being moved on the server-side
  3. Log into the web console
  4. Click “File explorer”
  5. Click into the desired backup set
  6. Click “Show jobs view”
  7. Click the backup job that contains the deleted data (the backup job located from the first step)
  8. Drill down to the deleted files/folders
  9. Select the checkbox next to them and click “Undelete”
  10. Leave the browser window open until the page loads – if the browser window is closed, the transfer of data will be stopped
  11. Confirm that the data has moved from the retention area back into the data area
  12. Monitor the next backup to ensure it is successful
Posted in File backup: Desktop, File backup: Server | Leave a comment

Where is the backup profile located

The backup profile contains a local cache of your backup settings, configuration and log files.

The active backup profile location is specified in the:

  • Windows: C:\Program Files\CyberSecure …\home.txt
  • Mac OS: /Applications/CyberSecure …./home.txt

If there are multiple entries in home.txt, inspect the scheduler info log file, located under: <program path>\CyberSecure…\log\Scheduler\info.log

It will have lines similar to the following: User: ‘login_name@ip’ Home: ‘C:\Users\sbsadmin\.obm’

The active profile is the value of “Home:”

Posted in File backup: Desktop, File backup: Server | Leave a comment

Can’t connect to backup server

What to do if you can’t connect to the backup servers

  1. Check general internet connectivity:
    1. Open a web browser and visit https://www.cybersecure.com.au – does the page load OK?
  2. Check your firewall:
    1. If you are running a software firewall, disable it and try to login again.
    2. If this succeeds, it means your firewall is blocking outbound connections to our servers. Follow our article on which programs to allow through the firewall for the backup service to function correctly.
    3. Try clearing the backup queue
  3. If all the above fails, contact our support team
Posted in File backup: Desktop, File backup: Server | Leave a comment

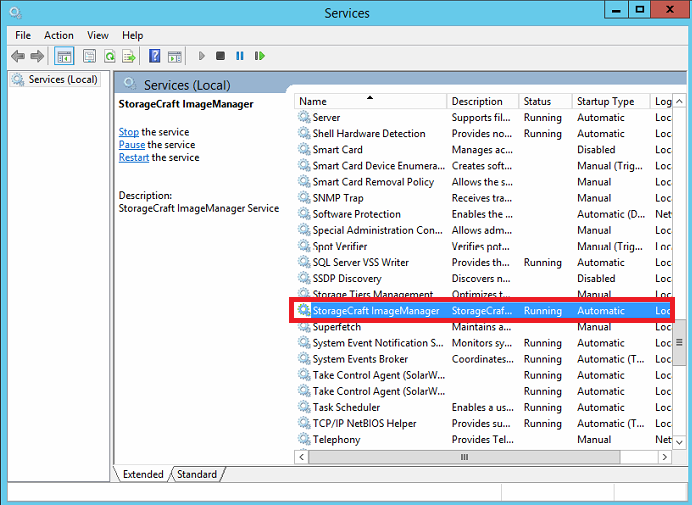
How to stop/start the Image Manager service

  1. Run services.msc
  2. Locate the service named:
        “StorageCraft ImageManager”

  3. Right click and choose “restart”.
  4. Wait a few seconds and refresh the list (using the F5 key, or via the view menu) to ensure it’s started again.

Further troubleshooting

On occasion the ImageManger.exe process will be blocked and needs to be killed in order for the service to correctly stop and start.

  • Open task manager, locate ALL ImageManager.exe, right click and choose “End process”.
  • Ensure that there are no ImageManager.exe processes running before attempting to restart the Image Manager service.
Posted in Other data protection | Leave a comment

ShadowProtect will not install when detecting Acronis / snapman.sys is installed.

Problem:

The problem is the ShadowProtect can’t be installed due to of Acronis TrueImage is installed and the file snapman.sys and snman380.sys existence.

Cause:

ShadowProtect cannot install because it detects that snapman.sys or snman380.sys exist in the C:WindowsSystem32Drivers directory

Deleting the snapman.sys or snman380.sys without removing the registry entries can cause the  system to crash with a blue screen (BSOD) or spontaneously reboots while ShadowProtect backups are running. This problem can occur when Acronis TrueImage is installed on the system. Acronis snapshot driver (snapman.sys or snman380.sys) causes these crashes when ShadowProtect attempts to create a backup.

Resolution:

Currently, the only solution from StorageCraft is to uninstall Acronis TrueImage completely and reboot.

Sometimes the TrueImage uninstaller does not remove the snapman.sys or snman380.sys from the system. If crashes during backups persist after uninstalling TrueImage, follow these instructions to manually remove the driver.

NOTE: Do not simply delete snapman.sys or snman380.sys, as this will cause your system to fail to boot or blue screen on boot.

  1. Uninstall the Acronis True Image and reboot.
  2. Download the Acronis removal tool in this link: http://kb.acronis.com/sites/default/files/content/2009/11/6177/abr_cleanup.zip, run it in CMD as a Administrator and reboot.
  3. If the snapman.sys still being detected by Shadow Protect installer. You had modify the registry by doing the following:  (NOTE: Backup the registry before you start modifying it).
    1. Go to the Start | Run… Type “regedit” and click OK.
    2. In the registry editor, navigate to:HKEY_LOCAL_MACHINESystemCurrentControlSetControlClass{4D36E967-E325 -11CE-BFC1-08002BE10318}.
    3. Remove the ‘snapman’ entry from the “UpperFilters” values. This will unregister the snapman.sys driver as a PnP filter for disk devices.
    4. Check the “LowerFilters” Key (if it exists) and remove any reference to Snapman.
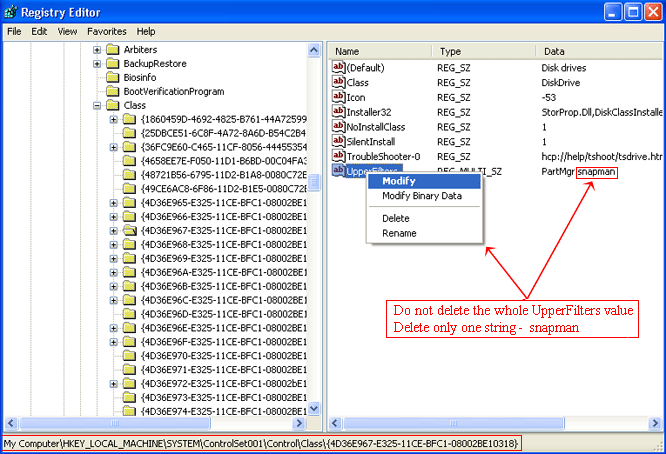
    5. Next, navigate to:HKEY_LOCAL_MACHINESystemCurrentControlSetControlClass{71A27CDD-812A -11D0-BEC7-08002BE2092F}.
    6. Remove the ‘snapman’ entry from the “UpperFilters” values. This will unregister the snapman.sys driver as a PnP filter for logical volume devices.
    7. Check the “LowerFilters” Key (if it exists) and remove any reference to Snapman
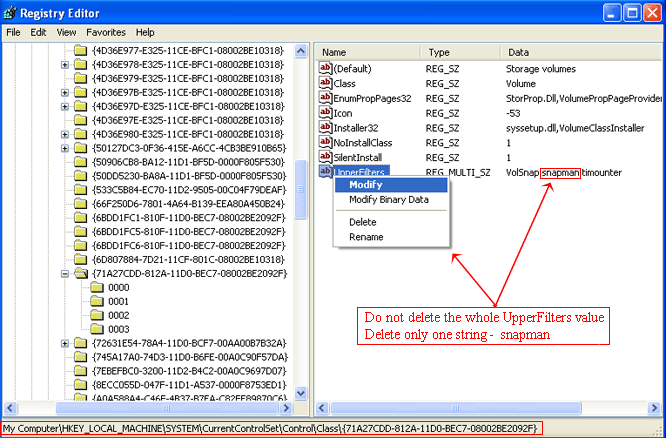
    8. Next, navigate to:HKEY_LOCAL_MACHINESYSTEMCurrentControlSetServicessnapman
    9. Add a REG_DWORD value named DeleteFlag with a value 1 inside this ‘snapman’ key. To do this, go to the Edit | New | DWORD Value. Type the name ‘DeleteFlag’, then double-click the icon next to it to enter the value of 1. Click OK. Next, double-click the Start REG_DWORD value inside the snapman key to change its value to 4 (disabled).
    10. Reboot
    11. Navigate to C:WindowsSystem32Drivers and rename snapman.sys to snapman.old. if snapman.sys is not found also look for snman380.sys.
    12. Change the settings so that hidden and system files are shown as well if the files are not found with a search.
    13. Reboot (Important: This will insure that Snapman.sys have been removed successfully. If it has not, the machine will blue screen. You will need to reboot the computer into safe mode and ensure that the process is completed properly before you will be able to boot ‘normal’ again.)

Notes:

If Snapman.sys or Snman380.sys are found on the computer and after the removal of the files and installation of ShadowProtect, the computer blue screens on boot, then snapman registry values were not removed properly.

Warning:

This solution involves editing the Windows registry. It is strongly recommend that you make a backup of the Windows registry and the OS before making any changes to the registry. Incorrect use of the Windows registry editor may result in permanent data loss or corrupted files. Modify only the keys that are specified. Only persons who are experienced in the use of the registry editor application should modify the registry.)


Posted in Other data protection, Other data protection: errors, ShadowProtect Backup | Leave a comment

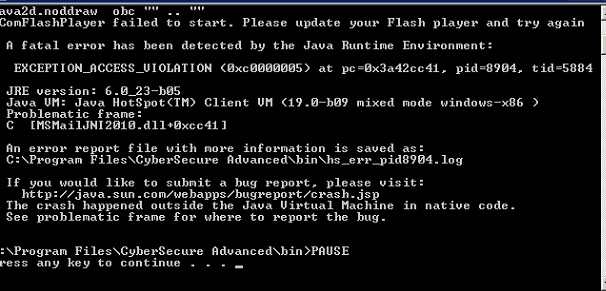
Exception_Access_Violation_XXXXXX (Exchange 2010 Mail Level)

Error

RunOBC32 can’t add a new backup set for exchange mail level.


Cause

The online backup manager profile in MAPI profile isn’t setup properly or corrupted.

Resolution

Download the MFCMAPI editor in this link: http://mfcmapi.codeplex.com/releases/view/101020 and install it.

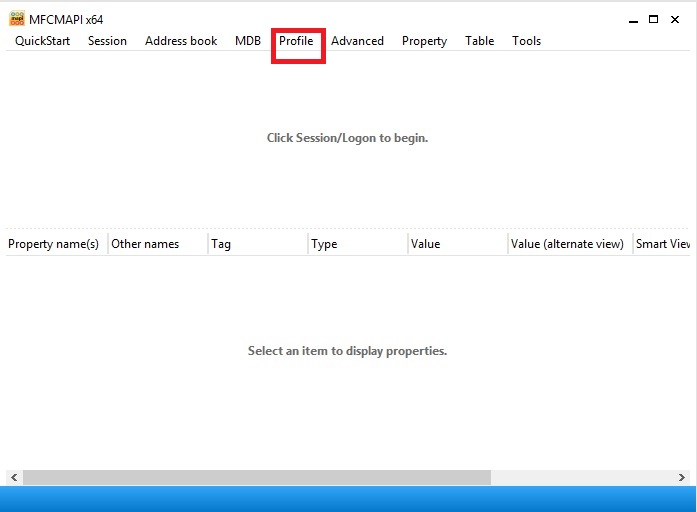
Delete the online backup manager profile in MFCMAPI editor under profile section.  Close the MFCMAPI editor after you deleted it.


Run the runOBC32 again to create new backup set for the Exchange 2010 mail level.

Posted in Exchange Backup, Exchange Errors, File backup: Server: general issues, File backup: Server: issues with backup, Microsoft Exchange | Leave a comment

Configuring ImageManager Email Notifications

ImageManager can automatically send email notifications when specific events occur.

To modify the notification settings

  1. In the ImageManager console, select the ImageManager agent that you want to configure.
  2. In the Configuration pane, click Notification Settings.
  3. In the Notification Settings dialog box, select the Conditions tab.
  4. Select the events that will cause email notifications to be generated. A notification will be generated if the box next to the event is checked.
    Failures Send an email when an ImageManager operation fails.
    Warnings Send an email when ImageManager needs attention to prevent a failure.
    Inactivity Send an email when the ImageManager agent is inactive for the specified number of days.
    Low Free Space Send an email when the space available in the managed folder drops below the specified threshold.
    All Daily Activity Send a daily email with a summary of the ImageManager operations.
  5. Click on the email setup tab In the Notification Settings dialog box.
  6. Enter the name of the email account that will receive the email notifications.
    SMTP Server Name
    The SMTP server name and port that ImageManager uses to send the email notification.
    If necessary, provide valid authentication credentials for the SMTP server. Select SSL to send the email via secure connection.
    Email Template The email configuration. Provide the email recipients and, if desired, a Sender name and Subject line for the notification emails.
    Send Test Email Sends an email whenever the ImageManager notification settings change.
  7. Click the “Send test email” button to verify that the settings work correctly.
  8. Click Save.

Note:


Just enable the following for notifications.

  • Failures
  • Low Free Space
Posted in Other data protection | Leave a comment

CExBackup::backupService:HrESEBackupSetup: Error Number 0xc7fe1f45: Instance not found

Error:

CExBackup::backupService:HrESEBackupSetup: Error Number  0xc7fe1f45: Instance not found.

Cause:

The drive where the transaction log files are saved is full.

Resolution:

To resolve this issue, remove un-needed log files to another disk drive to free disk space.

Refer to the following Microsoft Knowledge Base article for instructions:
For more information, follow article number to view the article in the Microsoft Knowledge Base:

How to remove Exchange Server transaction log files:

http://support.microsoft.com/kb/240145


Posted in File backup: Server: general issues | Leave a comment