- Open the SQL server configuration studio
- Login with appropriate admin-level privileges
- In the main console, right-click your server and choose “Properties”
- Click on “Security”
- Under “Server authentication”, ensure that “SQL Server and Windows authentication mode” is selected
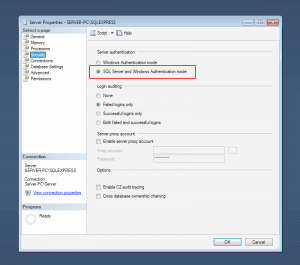
- Choose OK
- You may need to restart the SQL service for the changes to take effect
How to enable mixed mode authentication in MS-SQL server
Enable MS-SQL server to listen on IP addresses
- Open SQL server configuration manager
- Click into “Protocols for <SQL_INSTANCE>”
- Right-click TCP/IP and choose Properties (ensure it’s set to enabled)
- Click into the “IP Addresses” tab
- There will be a section for each IP address that the machine has – including for the “localhost” address and also for IPv6 addresses
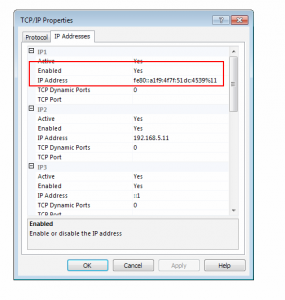
- Go through and “Enable” all the IP addresses that are needed.
- If you don’t know the correct local IP address, a simple “ping <servername>” will determine which IP address your current machine resolves to when referring to it by it’s hostname
- If unsure, consult a SQL or network professional to assist before making any changes.
- Click OK
- Restart the SQL server via services or the “SQL server services” item in the configuration manager.
How to enable TCP/IP on MS-SQL server
- Open the “SQL Configuration Manager”
- Expand “SQL Server Network Configuration”
- Click into “Protocols for <SQL_INSTANCE>”
- Right-click “TCP/IP” and choose “Properties”
- Choose “Enabled”
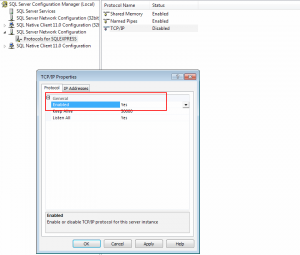
- Click OK
- Restart the SQL server instance – this can be done from the “SQL server services” item in the configuration manager
How to add a dedicated SQL backup service account
- Open SQL management studio
- Connect to the session as an appropriate admin user (this can be done using either Windows or SQL authentication) to the SQL instance
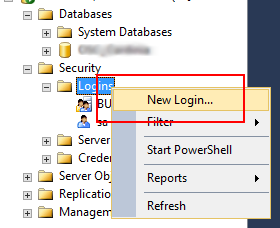
- Expand Security->Logins
- Right-click Logins and choose “new Login”
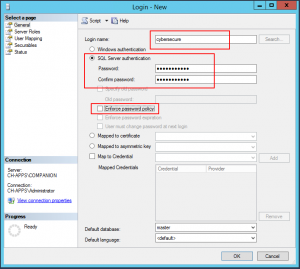
- Add the backup service account details, ensuring that you select SQL authentication and deselect “enforce password policy”
- Select “User mapping” on the left-hand panel tab, and ensure that ” db_backupoperator is ticked for the databases you wish to backup – you do not need to alter or add any other privileges.
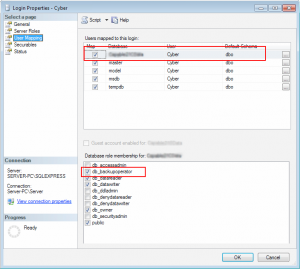
- Choose OK
- Now the backup agent should be able to use this SQL service account to backup the selected databases.
[Microsoft][ODBC SQL Server Driver][SQL Server]BACKUP DATABASE permission denied in database ‘XXXX’.
Error
[Microsoft][ODBC SQL Server Driver][SQL Server]BACKUP DATABASE permission denied in database ‘XXXX’.
Cause
- The user connecting does not have appropriate SQL permissions to access the database (scheduled backups use SQL authentication NOT Windows authentication).
- TCP/IP is not enabled on the SQL server.
- TCP/IP for the SQL server is not set to listen on the correct IP address.
- Mixed mode authentication is enabled on the SQL server.
- The SQL user’s password that the backup is triggering as may be expired
Resolution
- Grant appropriate backup privileges for the SQL user that CyberSecure is connecting to the SQL server as
- Enable TCP/IP on the SQL server
- Set the SQL server to listen on the correct IP address
- Enable SQL mixed mode authentication
- Disable password expiration on the SQL user login
No database file found for ‘Microsoft SQL Server\SERVER\INSTANCE\Database’
Error
No database file found for ‘Microsoft SQL Server\SERVER\INSTANCE\Database’
Cause
This means that the database was attempted to be backed up but the backup file does not exist. It can be caused by the spooling location holding previous SQL backup jobs for databases that do not currently exist.
Resolution
Try flushing the spooling location and re-running the backup.
SQL Server Driver][SQL Server]Cannot open backup device XXXX Operating system error 3(error not found)
Error
[Microsoft][ODBC SQL Server Driver][SQL Server]Cannot open backup device ‘XXXX’. Operating system error 3(error not found)
Cause
This is likely due to corrupted/incorrect data within the spooling location.
Resolution
- Ensure CyberSecure Advanced is on the latest version.
- Clear the spooling location by deleting all files & folders underneath it.
CExBackup::backupService:HrESEBackupSetup: Error Number 0xc80001f9: Backup is already active.
Error
CExBackup::backupService:HrESEBackupSetup: Error Number 0xc80001f9: Backup is already active.
Cause
The exchange server is busy in the process of being backed up.
Resolution
- Check that other backup software is not scheduled to backup exchange on a conflicting time to CyberSecure.
- Try the backup again at a later time.
- If that still doesn’t work and there is no other software taking an exchange backup, restart the “Microsoft Information Store” exchange service.
How to recover/migrate the locally cached config
This procedure would be performed if the encryption key needs to be retrieved from a previous computer or working installation.
- Open the “home.txt” file, which is located under the CyberSecure program files folder (eg: C:\Program Files\CyberSecure Advanced for advanced edition on Windows)
- Browse to the user profile location specified in this file (either a .obm or .acb folder)
- Under this location, take a copy of the entire “config” folder
- Replace the “config” folder under your new installation profile location
- Open CyberSecure and you should be able to retrieve the encryption password
